

Guest Author: Charles Graeme Black
You don't need to be a puzzle genius to master Stars. You just need to know what to look for.
These ten strategies are the building blocks every expert solver uses, whether they realize it or not. Learn them once, and they'll serve you every single day, from Monday's gentle start to Sunday's toughest challenge.
Ready to level up? Let's go.
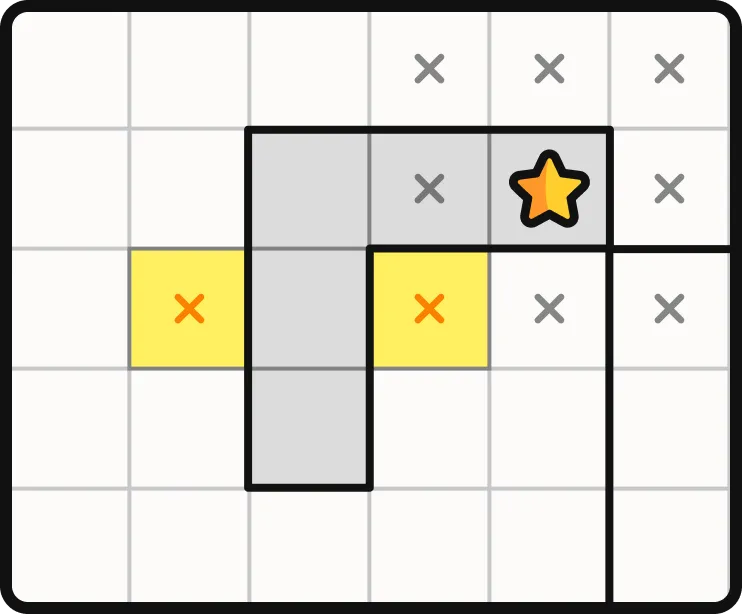
TIP 1
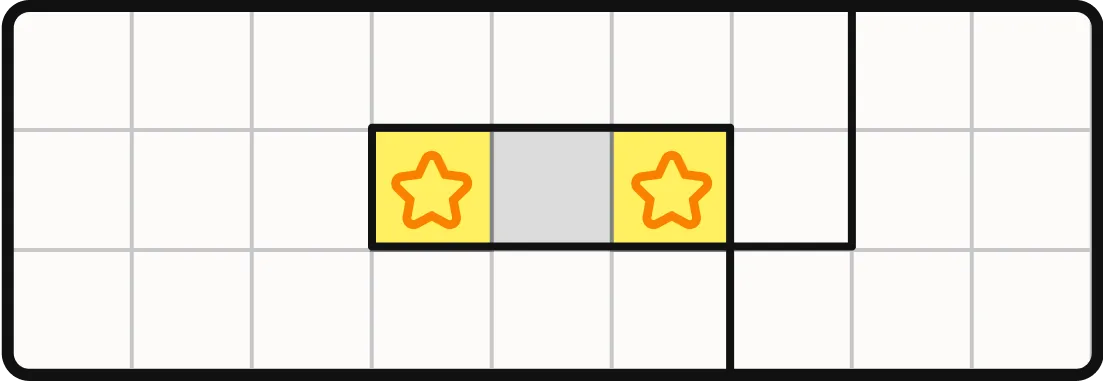
This is the easiest tip there is. Any area with just three open squares in a row can only be resolved one way, as shown above. Each area must have two Stars in it and Stars cannot be adjacent to each other, vertically, horizontally or diagonally.

Since Stars cannot be adjacent, you can now mark all of the cells surrounding a Star with an X. Don’t forget the diagonal cells, especially when they are in the corner of another region as they can be easy to miss!
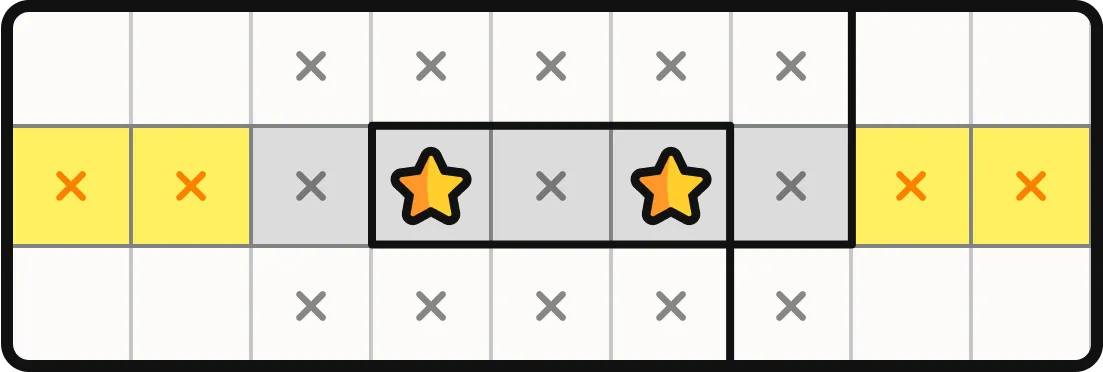
The extension of this TIP is that a single row (or column) can only have two Stars in it. The two Stars shown are in the same row and therefore no other cells in that row can have a Star. Mark them all with an X as indicated by the yellow highlight.
TIP 2
This involves a small L-shaped area of four cells. Because Stars cannot be adjacent, there cannot be a Star in the middle cell, so you can mark it with an X. Now you are left with two cells on the left and one cell on the right, so you can place a Star in the cell on the right, and mark all adjacent cells with an X.
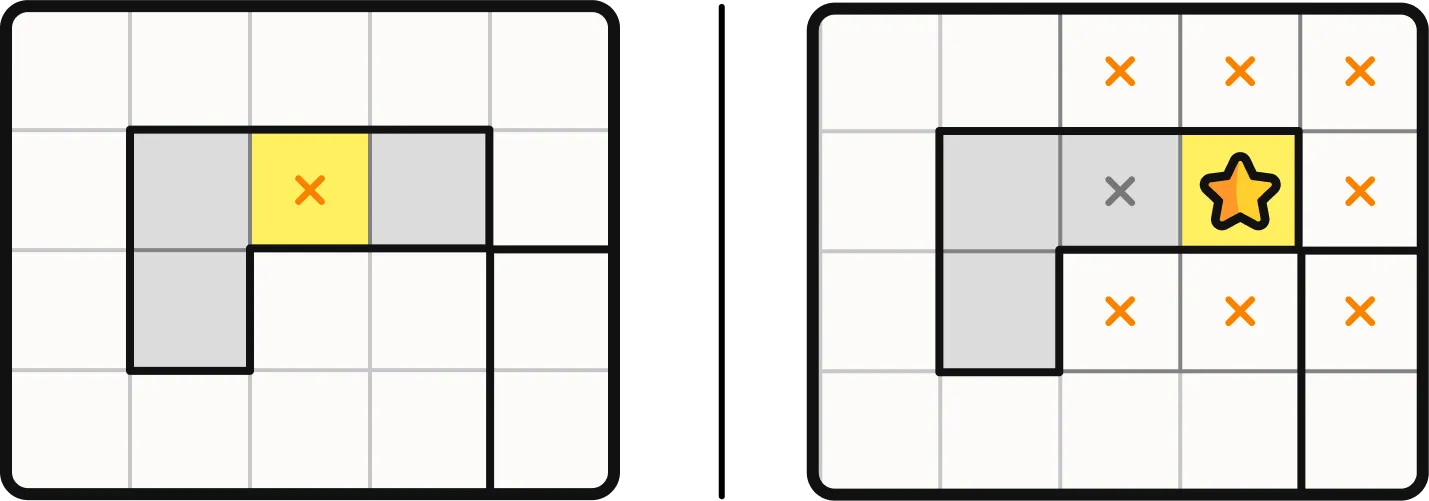
TIP 3
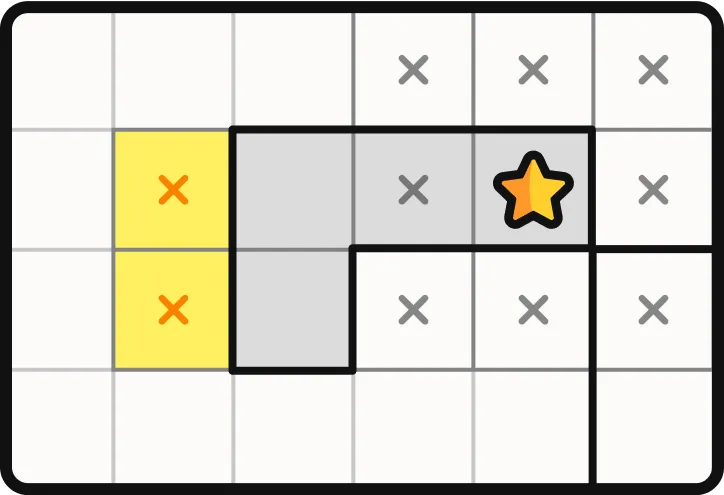
Tip No. 3 comes about when you have two cells where a Star must be placed. The L-shaped area only has one Star, and only has two open cells, so the second Star must be in one of those cells. This means the two cells on either side of those two open cells cannot have Stars or they would be adjacent to the Star in either of these open cells. Mark these cells with an X as indicated by the yellow highlight.
TIP 4
Tip No. 4 comes about when you have three cells in a row where a Star must be placed. The L-shaped area only has one Star, and only has three open cells, so the second Star must be in one of those cells. This means the middle cells on either side of those two open cells cannot have Stars or they would be adjacent to a Star in any of these open cells. Place an X in each location as indicated by the yellow highlight.
TIP 5

Tip No. 5 involves how many Stars can be in a group of rows (or columns). In the above example, there are three regions fully within the top three rows and a fourth area partially within them. Each of the three square areas fully within the top three rows must have two Stars in each area for a total of six Stars. The top three rows also must have two Stars in each row, for a total of six Stars. This means there can be no more Stars in any of the cells in the top three rows. Mark each of those cells with an X as indicated by the yellow highlight.
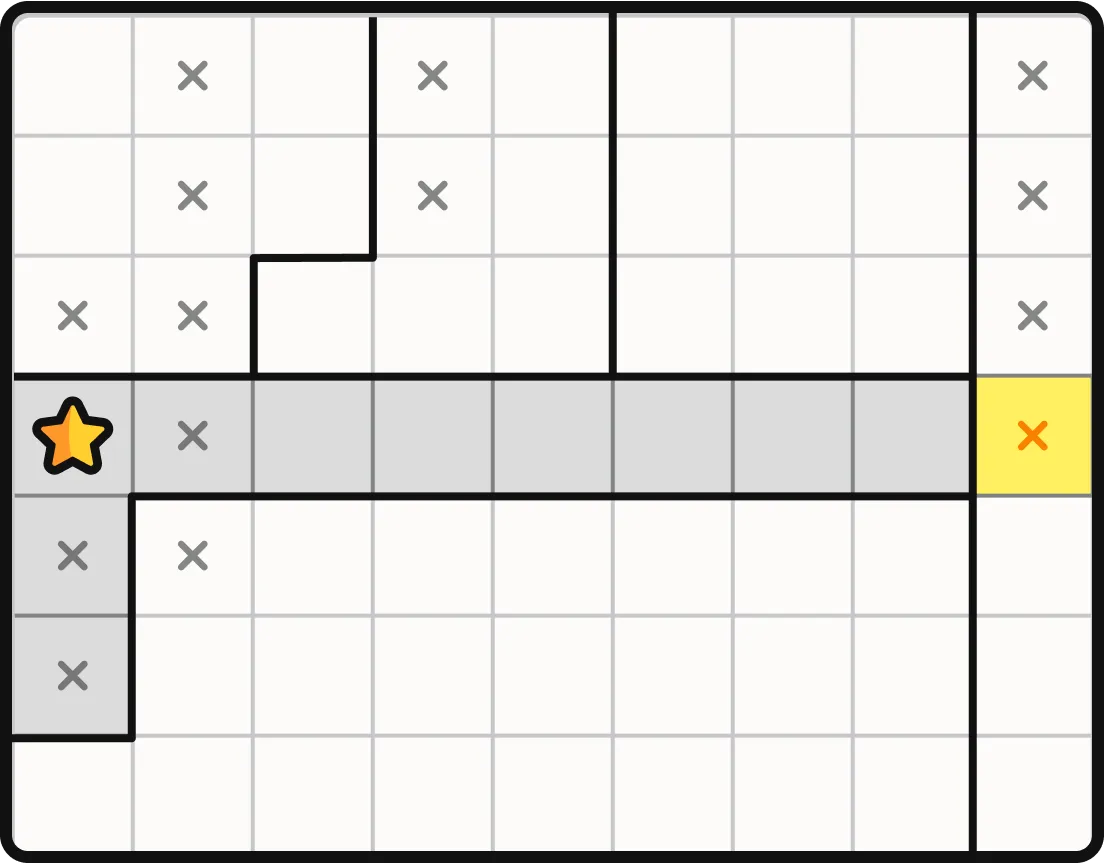
Notice now that the large L-shaped area has one Star in it and needs one more, but the only place that Star can go is in row four. That would cause row four to have two Stars, therefore you cannot have any more Stars in that row. Put an X in the vertical area as indicated by the yellow highlight.
TIP 6

Tip No. 6. Always visualize the potential effect of a Star on its surrounding cells. In the example above, if a Star was placed where the X is located, it would cause the purple shaded cells to have an X. This would leave only two adjacent cells in that area, not enough room for the necessary two Stars, so you know a Star cannot be in that position. Place an X there as indicated by the yellow highlight.
TIP 7
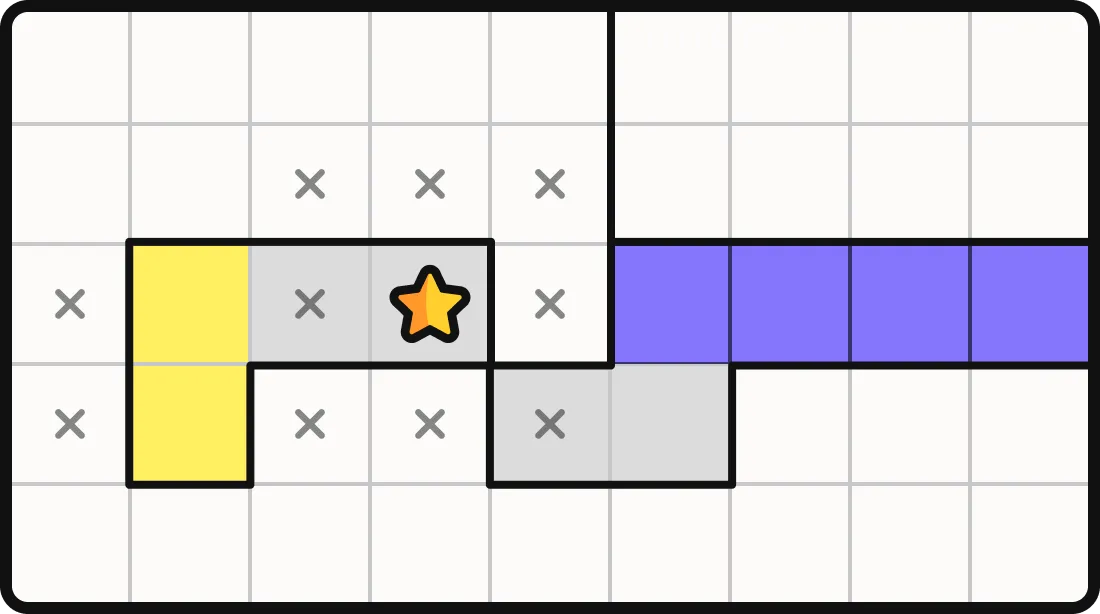
Tip No. 7 involves looking ahead. Looking ahead is simply mapping out the what-if of a decision to see how it interacts with the other rules and tips. In the above example, on the L-shape area, you know a Star has to go into one of the two highlighted yellow cells, but which one? If you place it in the top cell, that would fill that row with two cells, marking all other cells on the row with a X (purple shaded). That leaves only one cell in the region on the right to put a Star and every area must have two. Therefore, the Star cannot go in the top cell, it must go in the bottom highlighted cell.
TIP 8
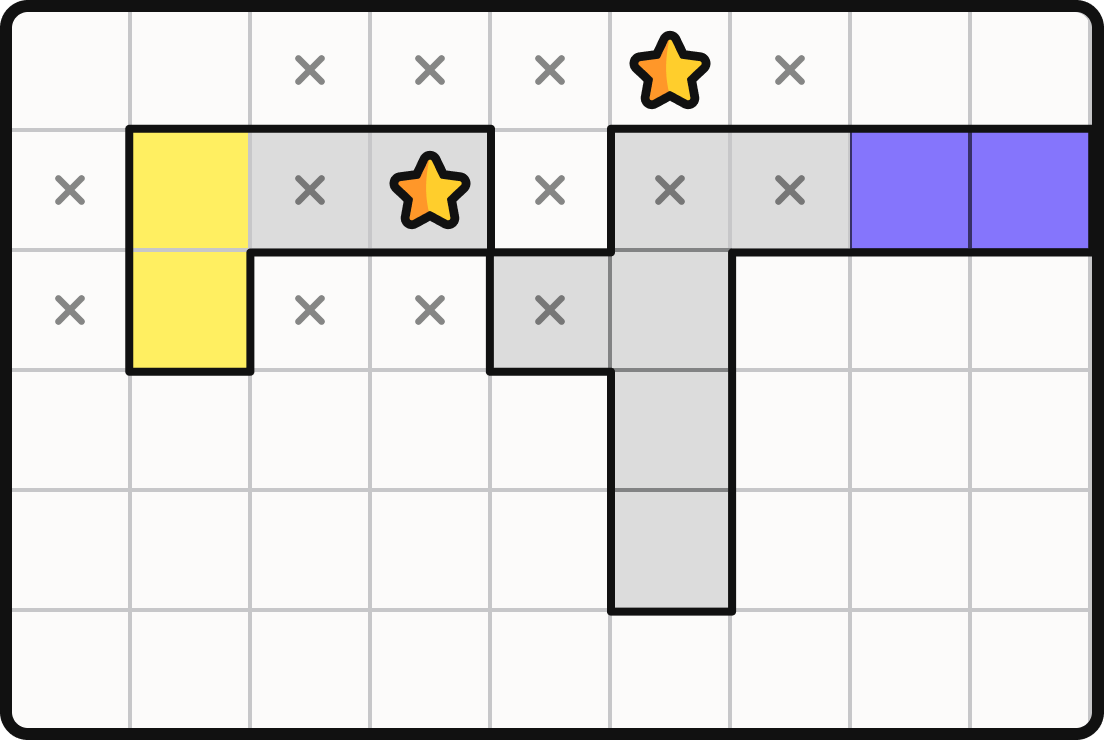
Tip No. 8 involves looking even further ahead. In a similar example, placing a Star in the top yellow shaded cell would cause the purple shaded cells to have an X , because row two would have two Stars in it already. This would cause both Stars in the purple shaded area to be in column six, however there is already a Star in column six. That would result in three Stars in a column, which is not allowed, therefore the Star must go in the bottom yellow shaded cell.
TIP 9
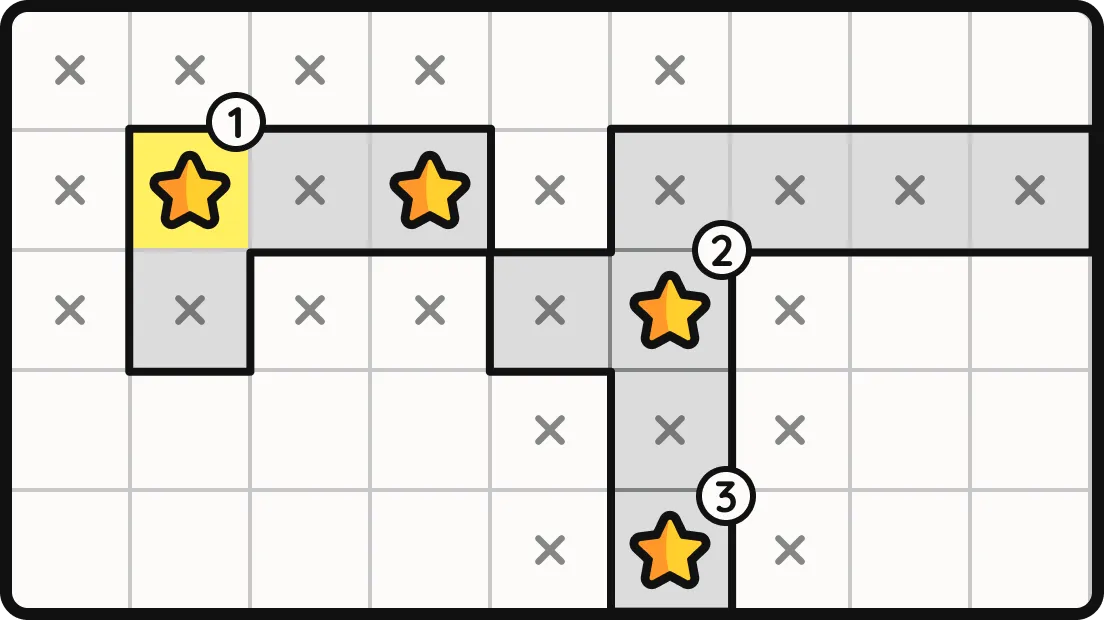
Tip No. 9 is a device to help when looking even further ahead. In the above example, which is the same a Tip No. 8, but without the Star in the top row, let’s say you wanted to see what would happen if you placed a Star in the top cell (1). After filling in all of the results of that choice (2 and 3), you can see how much different the puzzle looks compared to the starting point. You may have to go much further that just one or two steps ahead to get to a situation that is not allowed, thereby indicating the Star in the top cell (1) is a mistake. The game has an undo button, but sometimes it is hard to remember exactly how far back to undo. If you are a fork in the road like this, click on the desired starting cell a few times to turn the Star on and off a couple of times. That way, when you are undoing, you undo until you see a Star “twinkle”. Then you know you are back at the initial decision point. Turn it into an X and put the Star in the other location. I would do the same thing again from that point too, because you may find that choice doesn’t work either, which means you’ve made a mistake before this decision point.
TIP 10
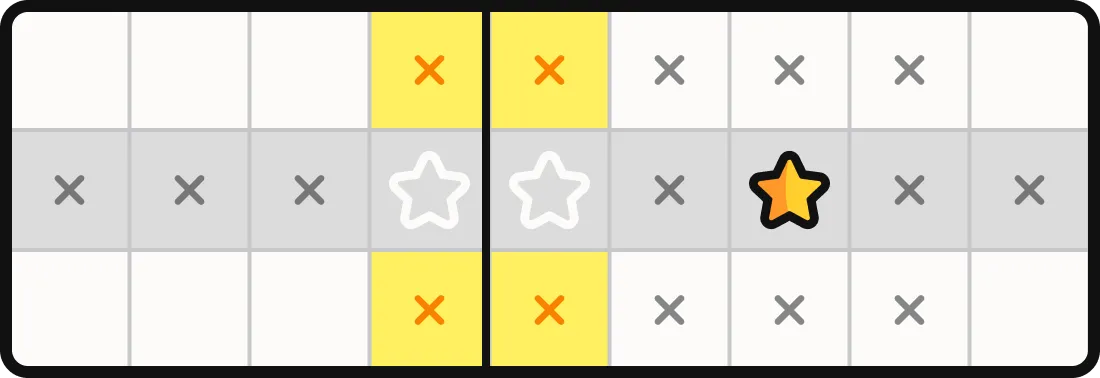
Tip No. 10. Remember that these rules and tips apply equally to areas, rows and columns. An area, row and column must have, can only have, two Stars in it. In the above example, the second row already has a Star in it, meaning a second Star must be in one of the two grey shaded cells. You can now apply Tip No. 3 to this and mark the cells above and below them with X's as shown by the yellow highlithed X.
From Strategies to Instinct
The best part about these strategies? You don't need to memorize them. Play a few puzzles with this guide open beside you, and these patterns will start clicking automatically. What felt impossible on Friday will soon feel like a satisfying challenge. That's not because the puzzles got easier, it's because you've trained your brain to see the logic underneath. Now go solve today's puzzle with fresh eyes.
Special thanks to Stars extraordinaire Charles Graeme Black for creating this comprehensive guide.
.png)
.png)
.png)
.png)
.png)
.png)
.png)
.png)